
Things started when I got my first Raspberry Pi last year on October. My initial intension of getting a RPi is to set up a pi-hole DNS for Ads filtering in my LAN network. The version that I got is the RPi 4B 4GB version. It is quite overkill for Ads filter DNS. So, I started looking for projects that I can do with my RPi. I found a video on youtube that the youtuber used a old monitor and a RPi to create a Magic Mirror. It is a mirror with information that shows on the background. That caught my interest. I got a old screen that is being replaced by a IPS panel for my laptop. Since then it was sitting at my closet doing nothing. It is perfect for this project. I don't have to go to buy a new one.
After deciding doing this project, I went to a local glass store to get a two way mirror. This is the type of mirror glass that's required for the project, you can see through on one side so images can pass through from the monitor screen, another side is just like a normal mirror. And that happened like 5 months ago. I was busy doing my winter break personal project, so this project was delayed till the middle of last month, which was February. I am writing this blog on the last day of March even though the project finished in the first week of the month. I have more time to write things down now, because everyone is staying at home to prevent spreading the virus. Hopefully I can finish this blog in the next few days...
Back to business, so I still needed more materials for this project. I need a eDP controller for the screen, which I ordered from AliExpress on January. The old screen that I pulled out from my laptop cannot just run like a normal monitor. It need a controller and also a power supply. And I need wood to make the frame for the mirror and the screen panel to sit in.
Below it is the list of my materials of this project:
Hardwares#
- Raspberry Pi 4B 4GB ver. Bundle from Canakit
- CanaKit USB-C Power Supply with power switch
- 3 Aluminum Heat Sinks
- SanDisk 32GB MicroSD card
- USB MicroSD card reader
- Pi Case with a fan
- HDMI to micro HDMI cable
- Keyboard & Mouse (Require for setting up the RPi)
- N156HGE-EAL model TN panel screen from my laptop
- A eDP LCD controller board for the N156HGE-EAL model specifically
- An old Matsunichi portable hard drive (This will server as a small LAN NAS for file transfers between devices)
- A two way glass mirror (10" x 15")
- A thin particle board (10" x 15") (I got that from a broken old desk)
- Precut wood for building frames
- Wood oil
- Wood glue
- Corner Brace
- Flat Corner Brace
- Screws (Like wall screws, computer screws. It depends what size you need)
Softwares#
- Raspbian Buster with desktop
- Pi-Hole
- Magic Mirror 2
- Samba
Carpentry#
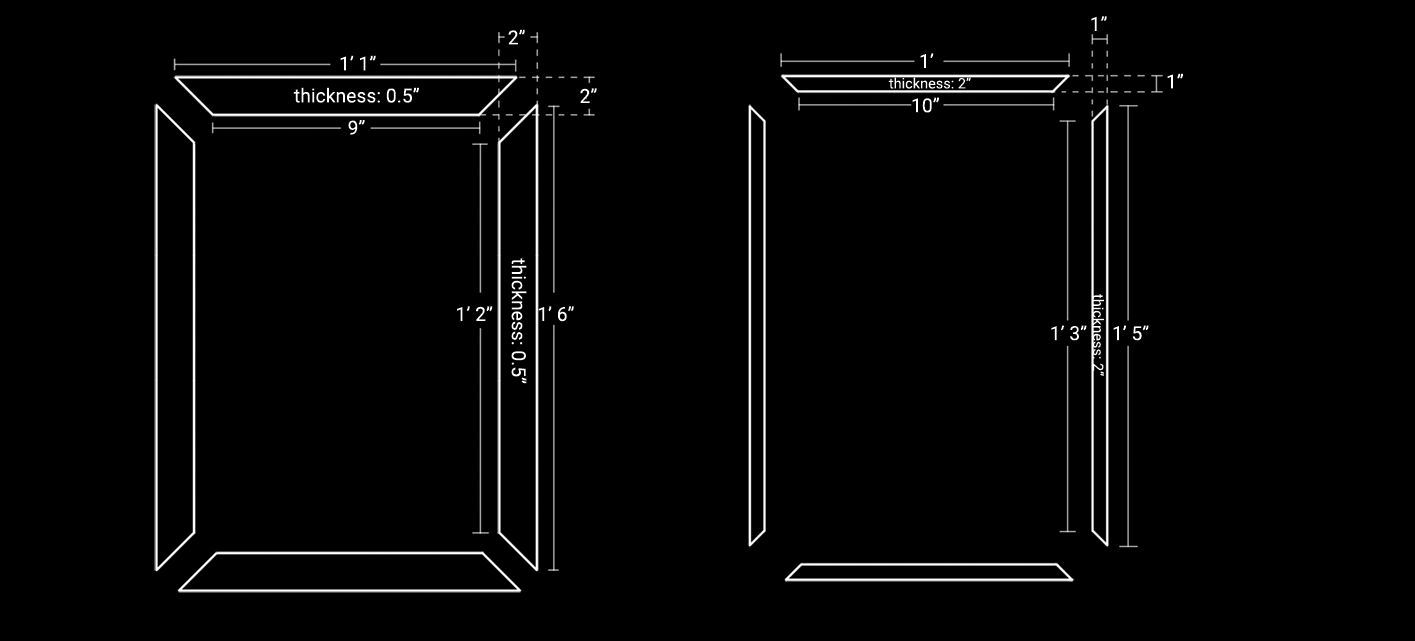
I drew a blue print of the mirror frame. I was planned to ask the carpenter to cut the wood for me. Then I found out that local store sells lumber supply only, it doesn't provide any carpentry service. So I have to do the carpentry on my own.
Geez that was hard. I would say that's the most difficult part of this project for me, because I never done any carpentry work before. I ended up asking my dad to give me a hand to cut those wood into the shapes that I want. Then I do the sanding, gluing, oiling on my own.
The final result of the frame was a little bit off compare to the blue print, because of the precut wood is thinner than what I drew on the blue print. So I tweak the size for the back frame a little bit to match the size of the mirror. The frame pieces did not get the perfect smooth cut, but everything kind of worked out for me. Not complaining.
Below is the process of making the frame, follow the red line is the process:
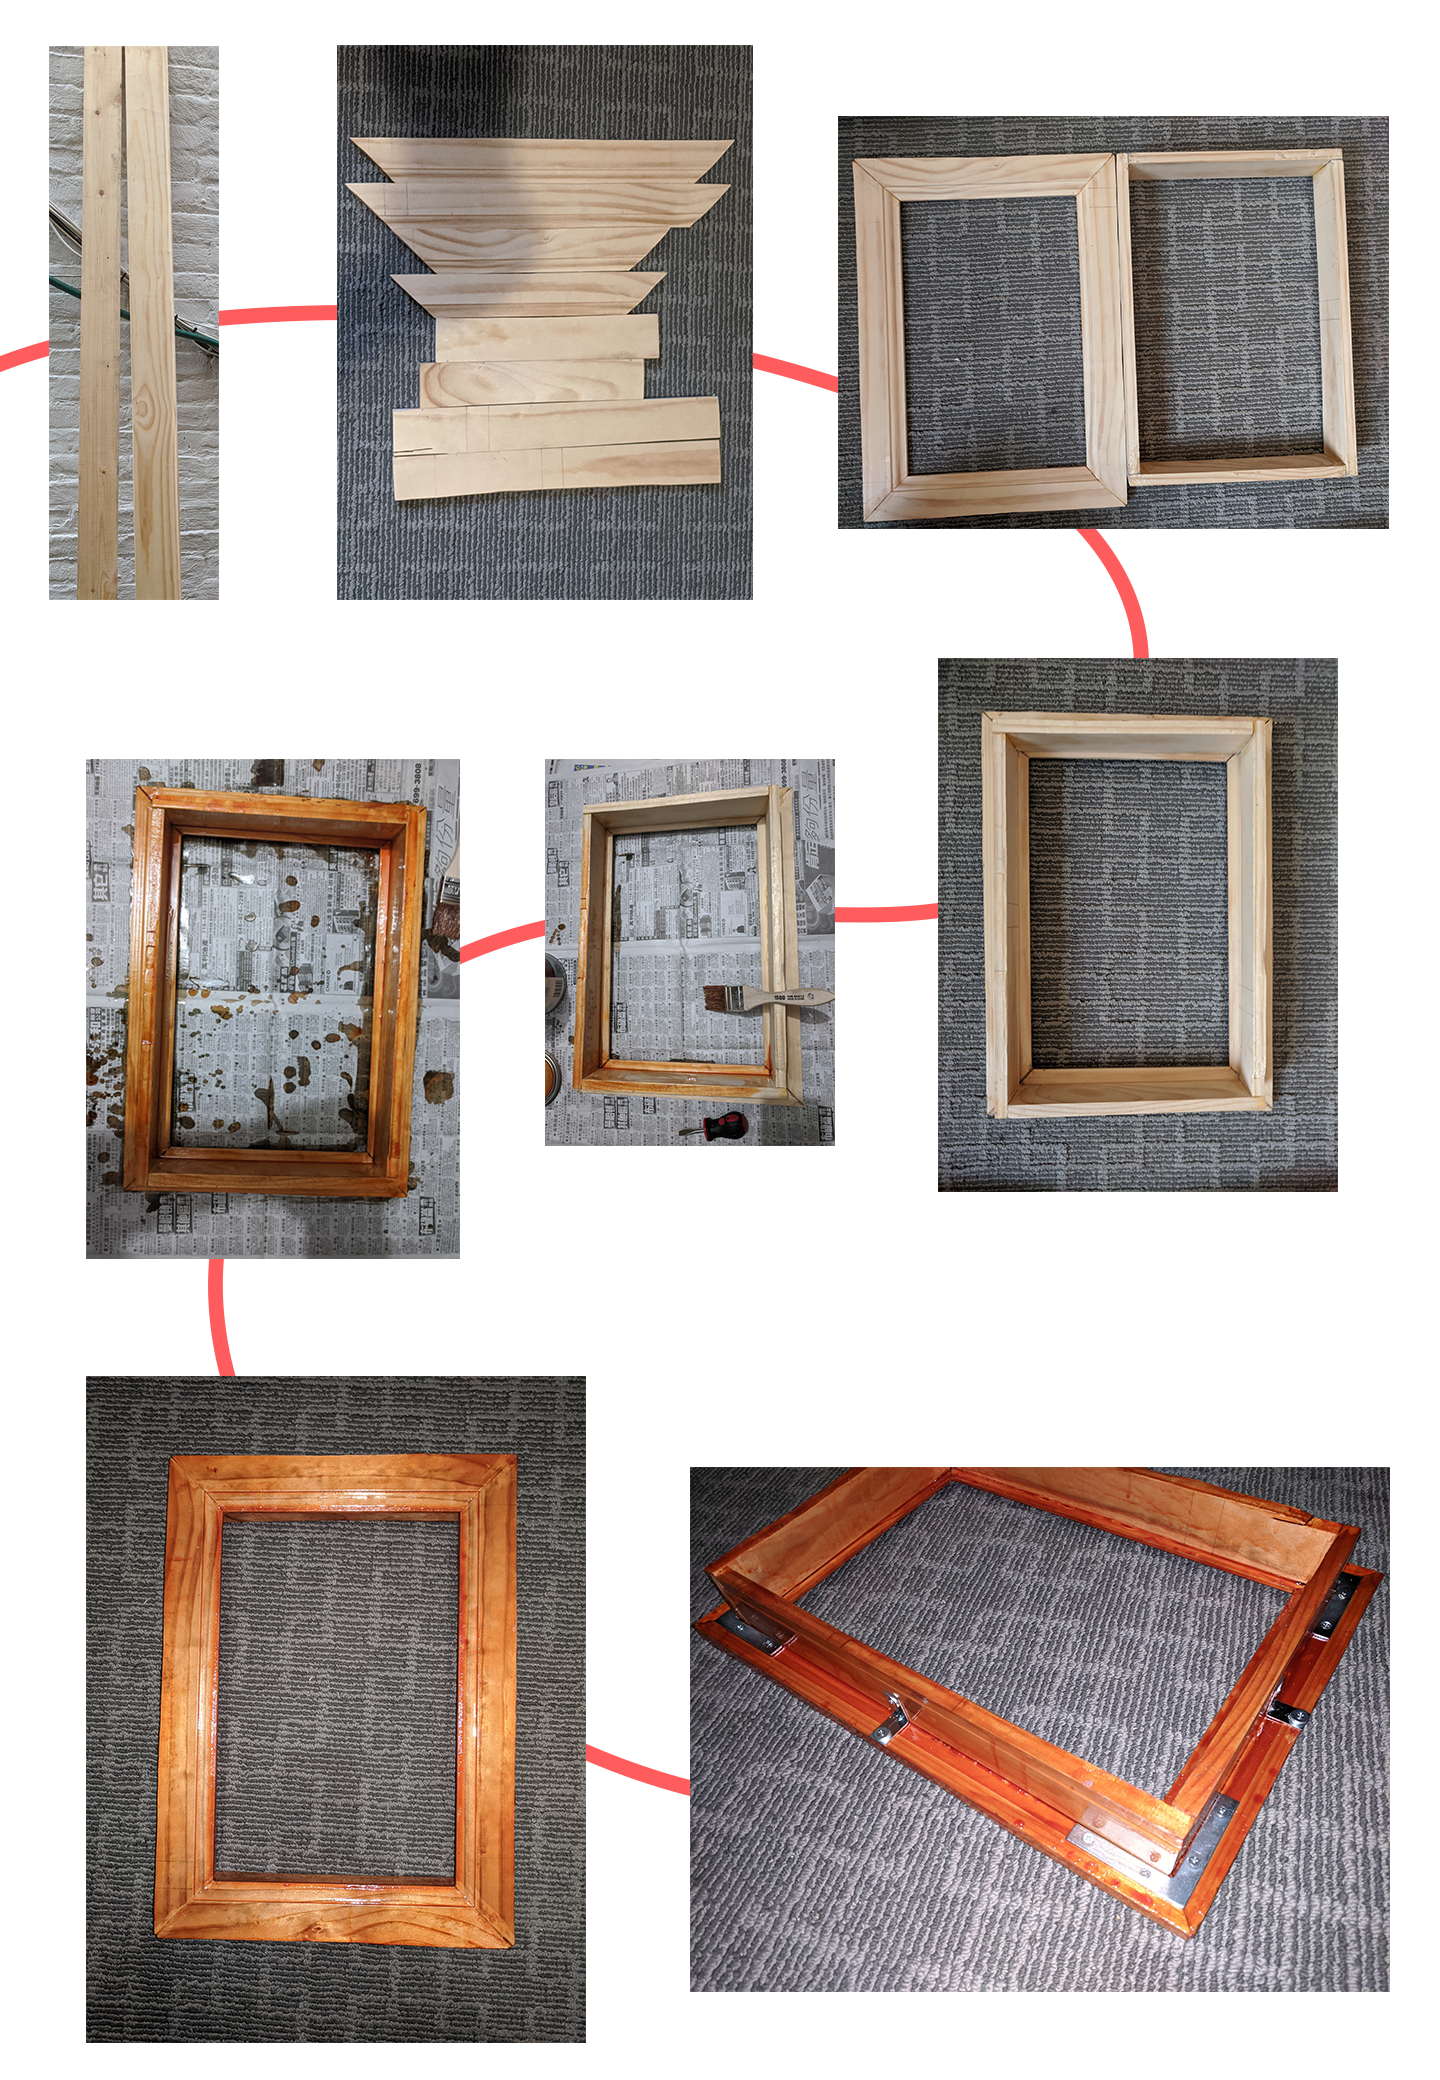
Description of the image above:
- raw precut Wood
- cut the wood into pieces to build the frame
- glue the front of the frame and back of the frame separately
- glue the front and the back of the frame together
- brush wood oil on the frame
- finished brushing of the back
- finished brushing entirely and waited for it to dry overnight
- add corner brace for additional stability of the frame
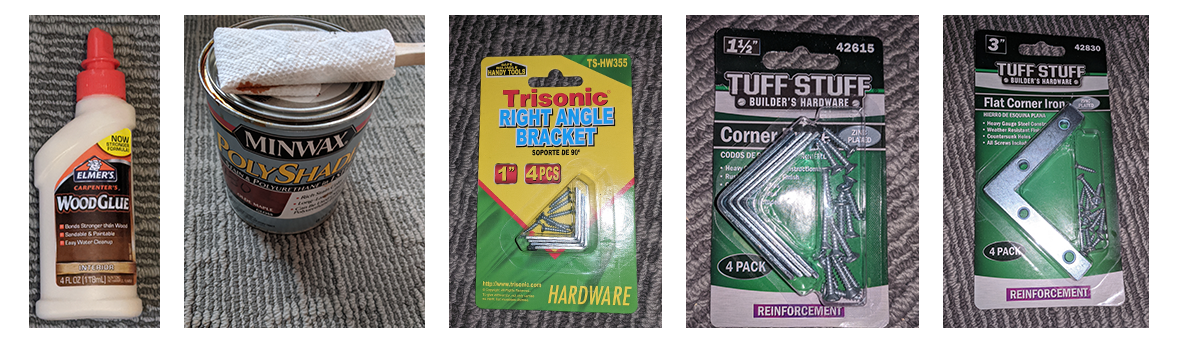
These are the materials that used for building the frame(except the wood):
Screen and the Back#
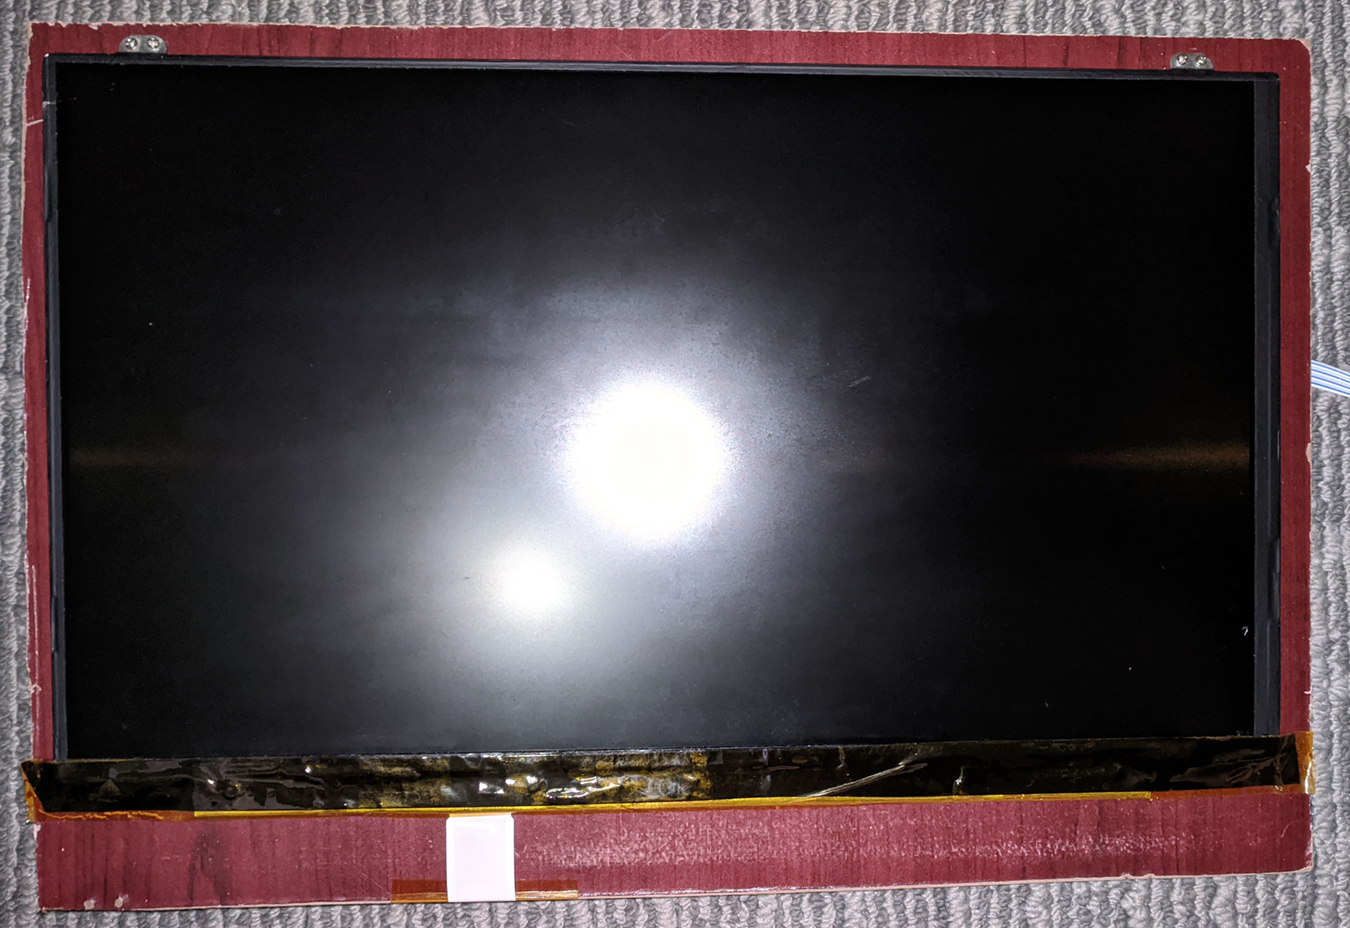
The laptop screen has metal plates with screw holes attached , so I just need to get some mini screws that fits the holes. Then connect the signal cable to the back of the screen and put it on the particle board.
This is how it looks on the front:
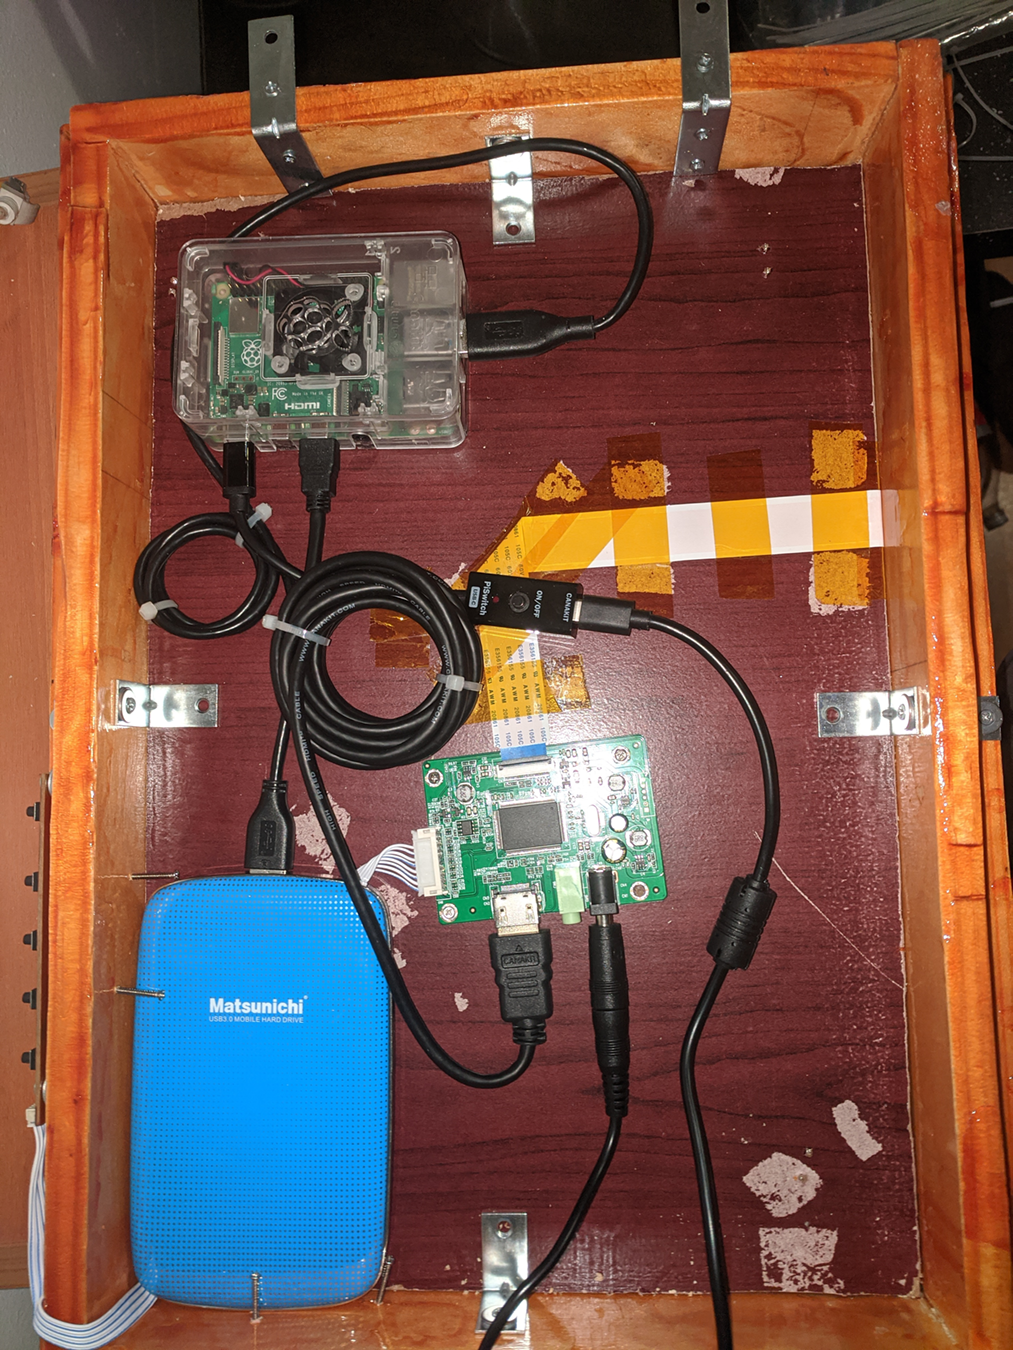
The RPi case has screw holes on the bottom, that's how I hold the RPi with the case on the particle board. The eDP controller is the same, hold with screws, but the eDP controller button PCB is put outside of the frame for easy access. The hard drive, it doesn't have any screw holes. So I used some long screws to hold it on place. It is not very stable, but it is good enough. The last thing to do is just connecting all the cables and power supply together.
Below it is the finished look of the back panel.
Setup the Pi#
Raspbian Installation#
I used etcher to install Raspbian in the SD card. For how to do that you can read the following tutorial.
[Tutorial of Raspbian Installation]
!If you have a SD card problem, which cause etcher installation failure sometimes, you can use the SD card formatter to do a complete formate of your card.
Pi-hole#
curl -sSL https://install.pi-hole.net | bash
I used the one line installation command to install pi-hole. For setup pi-hole, I just followed Linus Tech Tips' video from 5:06.
If you don't want to watch the video. You can also follow their forum tutorial that Linus provides.
Samba#
These are the two tutorial that I used for setting the samba server. I will also show the way I done it, which is the combination of these two tutorials.
[Share an external USB drive via Samba on your Raspberry Pi]
[How to Setup a Raspberry Pi Samba Server]
run the following command to look for the USB drive#
sudo fdisk -l
look for this in your result, you device name maybe a little different#
Device     Boot Start        End    Sectors   Size Id Type
/dev/sda1        2048 1953525167 1953523120 931.5G 83 Linux
create a folder and mount your drive to it#
sudo mkdir /home/pi/share
sudo chmod -R 777 /home/pi/share
sudo mount -t auto /dev/sda1 /home/pi/share
do a update of system packages and install samba#
sudo apt-get update
sudo apt-get upgrade
sudo apt-get install samba samba-common-bin
config samba#
sudo nano /etc/samba/smb.conf
add the following to the config file
[share]
comment = Share
path = "/home/pi/share"
writeable = yes
guest ok = yes
create mask = 0777
directory mask = 0777
force user = pi
add password to smb
!NOTE: This requires an existed unix user that has the same name. The default root user of the RPi is pi. If you want to use another username for samba, for example: you need to create a UNIX user named student before you create a samba user named student. In my case, I just use the default one.
sudo smbpasswd -a pi
config auto mount of the drive to the folder on each reboot#
sudo nano /etc/fstab
change or add this line
/dev/sda1 /home/pi/share auto noatime 0 0
Magic Mirror 2#
I just followed the official setup guide to set up Magic Mirror. Here is the link: MagicMirror Setup
Sometimes Magic Mirror will crash because of out of memory, and it doesn't start on boot. For auto-restart MagicMirror, you can follow this official guide on GitHub: Auto Starting MagicMirror
Quick Tips: Use
Ctrl+Qto stop MagicMirror. Runpm2 stop mmto stop auto restart if you set it up using the guide above.
Config Magic Mirror:#
Rotate screen:
Change rotation: Start Menu > Preferences > Screen Configuration, right click and choose rotation, pick the rotation you prefer.
Config and Add Modules:
You can find the documentation of MagicMirror Modules here: MagicMirror Modules Configuration
Usually it is the position property that you change a lot for customization, play around with it.
Example of adding a third party module:
This is the list of basically all the modules that you can find: [3rd Party Modules]
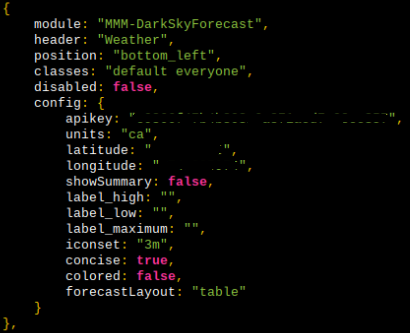
Let's say I want to install the MMM-DarkSkyForecast module. I will go to its GitHub repo and follow the installation instruction. Getting the required API key if it is needed for the module to be functional, and all other information it needs. Then I add the configuration to the config.js.
Usually author of the modules will provide the basic configuration that you can copy and paste, but sometimes you need to setup the config by looking at the documentation that they provided. In this case, I just copy and paste its sample configuration and start modifying it.
Sample Configuration of MMM-DarkSkyForecast module:
{
  module: "MMM-DarkSkyForecast",
  header: "Weather",
  position: "top_right",
  classes: "default everyone",
  disabled: false,
  config: {
    apikey: "SUPER SECRET!!!",
    latitude: "51.506130",
    longitude: "-0.090270",
    iconset: "4c",
    concise: false,
    forecastLayout: "table"
  }
},
Modifying it with Geany editor, this is my version:
For additional customization, you can play around with custom.css to change the look of each module.
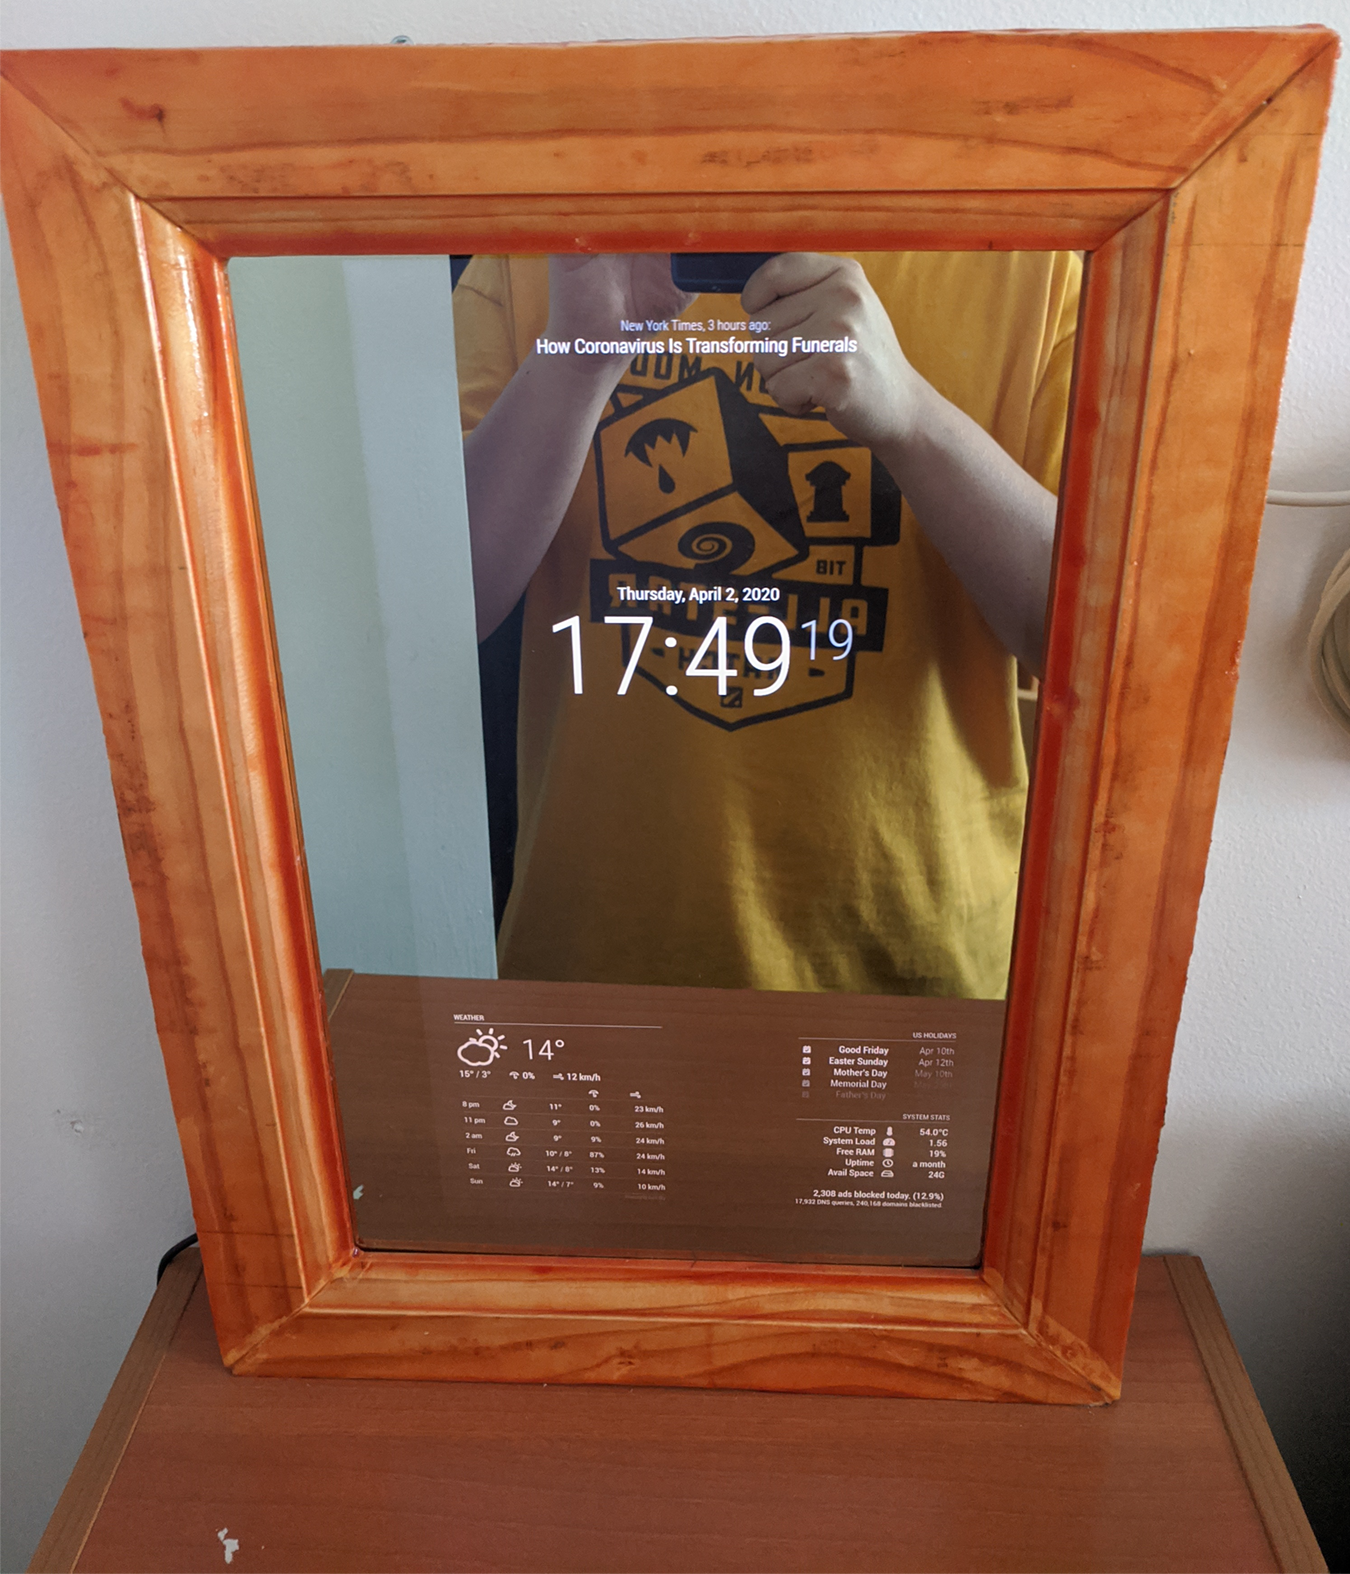
This is how it looks like after customization:
Last few words#
Well, the project result is not perfect, the frame is not smooth, the oiling is not even, and the back looks ugly. But at least to me, the front looks all good, so I am happy with that. Just want to say a few words to anyone who want to do the same project. Choose materials wisely. Glass can prevent scratches, but it is really heavy, combine with wood frame. You also want lighter wood to build the frame, and acrylic or other material for the mirror instead of glass. Mine is kind of heavy, I don't want it to fall off the wall so I put it on my small bookshelf and with two screws holding it to the wall. And you want the size of the frame matches the size of the screen, also. Otherwise you can see the edge of the screen in low light environment. Mine screen is a TN panel, I can see a clear screen edge during low light. A VA panel maybe better choice for this project because it has better contrast.
My RPi is not being use to its full potential even it is running a DNS server, SMB server and MagicMirror. I am stilling thinking what I can do more with it...[<=To Be Continue]